Mosh, short for “mobile shell”, is a “remote terminal application”. It allows you to access any server on the command-line that you have SSH access to. In contrast to SSH though, mosh is optimized for flaky internet: The connection keeps working even if your WiFi network changes and even if you decide to suspend your computer because you need to move nearer to the coffee machine.
Mosh implements a bunch of fun ideas. For example mosh client predicts traditional shell behavior for faster typing response, and mosh server only transmits buffered screen diffs to transfer less crap for commands with huge output and to keep `Ctrl-C` working. In this article, I focus on how the connections work, and how they can be tunneled over proxy machines to accommodate IP-based firewalls.
How does Mosh work?
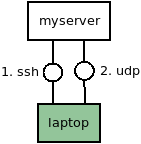
Mosh works in two phases: First, the mosh client uses normal SSH to establish a connection securely. Afterwards, your computer and the server communicate via encrypted UDP. That is why Mosh is so robust against connection failures and bad internet. The following picture illustrates this:

Mosh directly connects to the target server
To get mosh to work, you install Mosh on both your computer and the server, for example with ”apt install mosh”. If you would normally connect to the server using ssh myserver, then “mosh myserver” should work fine. (That is, unless a firewall is in the way. Below more about that.)
What does the Mosh client do exactly on setup? After SSHing to the target server, it runs the command “mosh-server”. The Mosh server then starts listening on a UDP port in the allowed range. You can do this step manually, too: SSH to a server and run “mosh-server” in the shell. No need to be root, any unprivileged user is good. You’ll see something like this:
MOSH CONNECT 60001 EPZ2sM6Alaaaad4AxWRIqg

mosh-server (mosh 1.3.2) [build mosh 1.3.2]
Copyright 2012 Keith Winstein <mosh-devel@mit.edu>
License GPLv3+: GNU GPL version 3 or later <http://gnu.org/licenses/gpl.html>.
This is free software: you are free to change and redistribute it.
There is NO WARRANTY, to the extent permitted by law.

[mosh-server detached, pid = 15204]
The “MOSH CONNECT” line reveals the port that the server is listening on for UDP packets and the secret key to encrypt and authenticate UDP packets. You can now connect to this server using the mosh-client command:
MOSH_KEY=EPZ2sM6Alaaaad4AxWRIqg mosh-client myserver 60001
Voila! You’ve a secure shell on your machine that is robust against intermittent internet problems.
The UDP connection and Firewalls
For the UDP packets, Mosh regularly uses the port range 60000-61000, from which it chooses one port to listen on and send packets from. This is the range your firewall needs to allow. You can configure mosh to use different ports, of course, if that makes it easier.
Using a proxy for the initial SSH connection
SSH servers are traditional targets for scripted attacks. One way to reduce attack surface is to use proxies or jumper machines: Your server ignores all packets to your SSH port that do not come from one of the jumper machines.
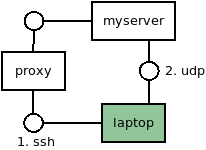
That means, your Mosh connections will look like this:

Mosh sets up by proxying SSH, but then connects directly via UDP to the target server.
You can configure this with a proxy command in your SSH config:
ProxyCommand ssh -q proxy nc -q0 myserver 22
Replace “proxy” with the name of the machine you want to use for proxying.
Since Mosh uses SSH to setup, it’ll take advantage of this SSH proxy immediately. That means, when setting up the mosh connection, SSH will go via the proxy machine, and afterwards, the UDP packets will go directly between your machine and the server.
Of course, if your firewall also only allows UDP from that proxy machine, you’re in for some more work.
Using a proxy for the UDP connection
Mosh does not support routing the UDP connection through a proxy, at least not that I found. That means, you’ll have to do a couple of things by hand. I didn’t go through the chops of automating them just yet.
First, you need to start a Mosh server on your server. SSH to your server, and run “mosh-server”. By using the following environment variable, you’ll ask the server to shutdown, if it’s not received anything from the client for a day. That’s helpful for automatic cleanup.
MOSH_SERVER_NETWORK_TMOUT=86400 mosh-server
The Mosh server will respond with its usual message. Note down the port and secret key. For example, it might output this line:
MOSH CONNECT 60001 EPZ2sM6Alaaaad4AxWRIqg
You note down 60001 (port) and EPZ2sM6Alaaaad4AxWRIqg (secret key).
Then, you need to create a two-way UDP forwarder on the proxy. You start by creating a named pipe. I chose /tmp/fifo, but it can be anywhere you have write access, really.
mkfifo /tmp/fifo
Then you use netcat to tunnel UDP packets incoming on port 60005 to the target server on port 60001 and back. If your Mosh server above started listening on a different port, then you need to substitute the 60001 here.
Also note that you might want to run this in a tmux or screen, or use nohup to disconnect it from your SSH session. Otherwise, there isn’t much point to this.
sudo nc -D -l -u -p 60005 < /tmp/fifo | nc -u myserver 60001 > /tmp/fifo
We use two netcat processes: one for receiving, one for sending. Incoming packets from the client are forwarded via a Unix pipe to the second netcat who sends the packets onwards to the target server. Replies from the target serevr are sent to the named pipe `/tmp/fifo`, which is being by the first netcat, which forwards them to the client.
I got the above netcat solution from Guillaume Cottenceau’s article on SSH tunneling. There may be a a simpler way using socat, which omits the named pipe and makes cleanup easier, but I couldn’t get it to work quickly.
Finally, you need your Mosh client to connect to the proxy, because that one is forwarding the UDP packets to the target server.
MOSH_KEY=EPZ2sM6Alaaaad4AxWRIqg mosh-client proxy 60005
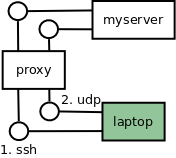
Everything now goes through the proxy!
![]()

Both SSH and UDP now go via the proxy.
Cleanup
Cleaning up. On your computer, you just kill the Mosh client by exiting the shell. If it’s still connected to the server, than that process will die, too. If not, the server process will terminate after a day.
On the proxy, you’ll have to kill one of the netcat processes, by killing one of them. And then you need to remove the named pipe, by running ”rm /tmp/fifo“.
What’s left? Automating all the above, so that Mosh can do this setup on its own. Another day.
Are you working in a remote team?
How is that going for you? Fun but not all rainbows, right? If you’d like to read how we handle the challenges of working in a geographically distributed team, you might read about the different types of remote workers on our team and why friction can be good. And because team building is hard we are playing boardgames every week.
How are you doing it? What works for you? Would love to hear it and learn! Leave a comment or write me on at muratk@engagespark.com.
